顯示具有 Raspberry Pi 3 標籤的文章。 顯示所有文章

2016年3月29日 星期二

Windows IoT Core - Light Sensor sample


這篇介紹在 Windows IoT Core 下, Raspberry Pi 3 如何接收光敏電阻的訊號!

而光敏電阻的訊號是類比訊號,
由於 Raspberry Pi 3 沒有接收類比訊號的 pin 腳,
所以必須先將類比訊號轉成數位訊號,
那該如何做?

 ADC0832 模組,它可以將類比訊號轉為數位訊號,
而在 Windows IoT Core 類別庫,也有相對應的函式庫支援,
所以使用這個模組是十分方便的,

流程簡單來說,就是 Raspberry Pi 連接 ADC0832,ADC0832 連接 Light Sensor

Raspberry Pi ←→ ADC0832 ←→ Light Sensor

先來看看 ADC0832,共 8 個腳位


腳位說明:
Pin Number Description
1 CS - Chip Select (Active Low)
2 CH0 - Analog Input Channel 0
3 CH1 - Analog Input Channel 1
4 GND - Ground
5 DI - Data Input
6 DO - Data Output
7 CLK - Clock
8 Vcc - Positive Supply


ADC0832 connect Light Sensor:
  • Signal ( OUT ) → CH0
  • VCC → VCC
  • GND → GND


ADC0832 connect Raspberry Pi 3:
  • CS → GPIO 18
  • GND → GND
  • DO → GPIO 24
  • DI → GPIO 24 (or just connect DO and DI together)
  • CLK → GPIO 23
  • VCC → 3.3V

電路圖:

Windows IoT Core Library:
  1. 建立 AdcProviderManager 物件
  2. 建立 ADC0832 物件,並指定 ChipSelectPin, ClockPin, DataPin 腳位,
    再加入 AdcProviderManager
  3. 透過 adcManager.GetControllersAsync 取得  adcControllers 物件
  4. 建立 AnalogSensor 物件,同時設定更新頻率
  5. 透過 AnalogSensor ReadingChanged 事件,即可取得訊號( Value, Ratio ),
    由於 ADC0832 是將類比訊號轉為 8bit 數位訊號,所以:
    1. Value  為 0 ~ 255
    2. Ratio 為比例

// Create ADC manager
var adcManager = new AdcProviderManager();

// Add ADC chips
adcManager.Providers.Add(
 new ADC0832()
 {
  ChipSelectPin = gpioController.OpenPin(18),
  ClockPin = gpioController.OpenPin(23),
  DataPin = gpioController.OpenPin(24),
 }
);

// Get the well-known controller collection back
var adcControllers = await adcManager.GetControllersAsync();

// Create light sensor
var lightSensor1 = new AnalogSensor()
{
 AdcChannel = adcControllers[0].OpenChannel(0),
 ReportInterval = 250,
};

// Subscribe to events
lightSensor1.ReadingChanged += LightSensor1_ReadingChanged;

AnalogSensor ReadingChanged event:
private async void LightSensor1_ReadingChanged(IAnalogSensor sender,
 AnalogSensorReadingChangedEventArgs args)
{
 // Invert
 var ratio = 1 - args.Reading.Ratio;
 var value = args.Reading.Value;
 // Update UI
 await Dispatcher.RunIdleAsync((s) =>
 {
  // do something

 });
}

AnalogSensorReading 定義:
public sealed class AnalogSensorReading : IAnalogSensorReadingClass
{
 public AnalogSensorReading(int val, double ratio);

 public double Ratio { get; }
 public double Value { get; }
}


DEMO:


2016年3月26日 星期六

Windows IoT Core & Raspberry Pi 3 - Blinky sample


學習要一步一步來,先來學習如何閃爍 LED 燈吧!
從微軟官網的範例來學習吧!  參考


需要的器材有:
  1. LED 燈泡 * 1
  2. 10 Ω 電阻 * 1
  3. 電線 * 2
  4. 麵包板 * 1

電路圖:

Windows IoT Core 控制 GPIO pin 腳位高低電底

  1. 透過 GpioController.GetDefault() 取得 GPIO Controller
  2. 取得 pin 物件,使用 GpioController.OpenPin()
  3. 設定腳位的高低電壓,透過 GpioPin.Write()
  4. 設定 pin 腳為輸出電壓腳位,使用 GpioPin.SetDriveMode()

發佈 AP 至 Raspberry Pi 3
  1. architecture:ARM
  2. 發佈對象選擇:Remote Machine
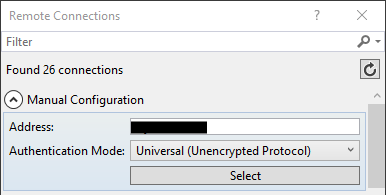
  3. 設定 Remote connection,設定 Raspberry Pi IP
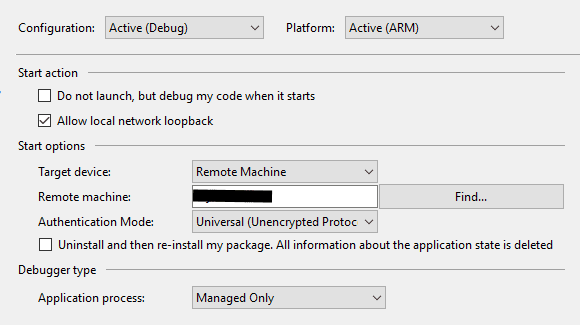
  4. 亦可在 project property winows,進行設定

即可在 Raspberry Pi 看到 UWP 畫面囉!

DEMO:

2016年3月20日 星期日

Raspberry Pi 7" Touchscreen Display - 開箱

為了方便開發及測試,決定入手 Raspberry Pi 官方出的觸控螢幕,
所以在露天拍賣訂了一個,等了幾天終於到貨囉!

外盒包裝:

內部零件:

物件清單:

  1. 7吋觸控螢幕 x1 
  2. 顯示驅動板x1 
  3. 支座與螺釘各 x4 
  4. 跳線 x4 
  5. 螢幕排線 x1
產品規格:
  1. 顯示尺寸:7寸
  2. 解析度:800x480
  3. 螢幕體積大小:194mm x 110mm x 20mm
  4. 螢幕可視區域:155mm x 86mm
  5. 觸控螢幕:FT5406 10指觸控電容式
  6. 重量:277g. 功耗:2.23W
安裝步驟: ( 參考 )
  1. check list
  2. connect the display ribbon cable to the back of the adapter board
  3. Lie the adapter board onto the back of the display then connect the touch screen ribbon cable into J4
  4. Attach the 4 x Standoffs & screw them though the adapter board into the back of the display
  5. Attach the DSI ribbon cable to the Adapter Board
  6. Use the 4 x screws to secure the Raspberry Pi board to the Standoffs then connect the DSI ribbon cable to the Raspberry Pi
  7. Connect the jumper wires form the Raspberry Pi to the  adapter board
  8. Power the display and Raspberry Pi Board
這樣就完工囉!

完工背面圖如下:( 下面的壓克力板是賣家提供的,不過太短導致電源線不易插入,
所以中間再接一個 L 架讓它延長一些,方便放置電源線 )


完工正面圖: ( 在 Windows IoT Core 觸控功能仍是正常運作 )


當然 Raspbian OS 也沒問題!


2016年3月15日 星期二

Windows IoT Core & Raspberry Pi 3 - install

最近 Raspberry Pi 終於出到第 3 版了,內建 wifi, BLE,有興趣就買囉!
再搭配 Windows IoT Core 平台來試試!

安裝步驟如下:

  • 安裝 Windows 10 IoT Core Dashboard
  • 安裝  Windows 10 IoT Core 至 MicroSD 
    • 安裝步驟參考:Manually set up your device
      1. 下載Windows 10 IoT Core Insider Preview iso 檔後,直接在 win10 掛載後,安裝裡面的 【Windows 10 IoT Core for Raspberry Pi ......msi】 即可。
      2. 執行 IoT Dashboard 設定新裝置
        1. Device Type:Custom
        2. image file:【"C:\Program Files (x86)\Microsoft IoT\FFU\RaspberryPi2\flash.ffu"】。
      3. click 【Download and install】。
      4. 安裝結束後, MicroSD  插到 Raspberry Pi 3,接上電源線即可。
    • 這邊有非常重要的一點,MicroSD 會挑片,必須用官方認證過的
      • 否則畫面會卡住進不了系統,畫面會卡在 "please wait while we get things ready",然後等到天荒地老也不會有下一步
      • 可用的 MicroSD  參考:Hardware Compatibility List
        • Samsung 32GB EVO Class 10 Micro SDHC
        • SanDisk Ultra Micro SDHC 16GB

  • 啟動畫面1


  • 啟動畫面2


  • 啟始設定畫面


  • 開始畫面


  • 將 Raspberry Pi 3 接上網路線後,回到 windows 10 後,在 IoT Dashboard 切到 My Device 頁籤,看到 Raspberry Pi 即代表成功囉!